Configuring WSJT-X to log to N3FJP for ARRL Field Day (part 1)

My amateur radio club (RCARCS) uses N3FJP logger for Field Day (we run N3FJP on one laptop and the log from each station over WiFi). This year I want to have a go at setting up a digital mode station to log automatically to N3FJP from WSJT-X to run some FT8, and also from fldigi to work PSK and RTTY. First up, let’s look at getting WSJT-X working.

WSJT-X doesn’t log directly to N3FJP (it does to N1NM though), but it does indirectly through the intermediate helper app JT-Alert. The setup we’re going to do then is:

WSJT-X -> JT-Alert -> N3FJP Field Day logger.

Starting with N3FJP, the first step is to enable the Server API from Settings / Application Programming Interface:

The next step after installing JT-Alert is to select ACLog (N3FJP’s main logging app) in the settings. The options give you a setting to connect to a locally running ACLog, and while this works for a local N3FJP’s ACLog app, it doesn’t for N3FJP’s Field Day logger. This part is not obvious, but to configure JT-Alert to log to the Field Day logger even if on the same PC you configure the remote connection settings and then also point it to the .mdb log file of the locally running N3FJP:

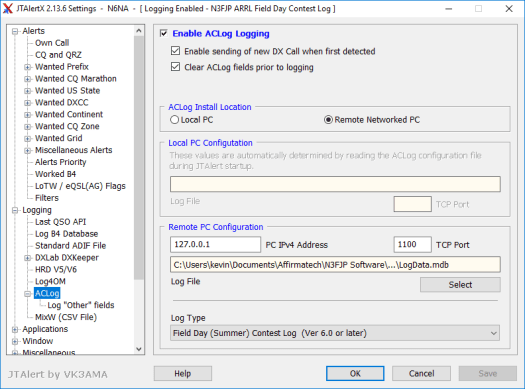
Here you also select the log type is ‘Field Day’. This approach for the config is in the Help docs for JT-Alert here:

Next, configuring network options in WSJT to allow JT-Alert to connect. Without making any other changes, if you start JT-Alert and then start WSJT you’ll see these two dialogs which tell you what settings you need to change in WSJT:

In WSJT settings on the reporting tab, select all 3 checkboxes in the UDP section, and replace the default 127.0.0.1 with your current IP address, e.g.

To use FT8 for Field Day, WSJT has a setting to customize the exchange to include the required class and ARRL section:

To test out the config so far, start the apps in this order: N3FJP, JT-Alert, WSJT. To test logging a QSO, enter a test call in the DX Call field and press the Log QSO button:

… note here when running Field Day mode you should enter the correct exchange sent and exchange received so the QSO is logged correctly in N3FJP.

The log is automatically sent across to N3FJP via JT-Alert:

I noticed if you don’t manually enter the exchange sent and received then it will populate just the callsign field with the sent and received still blank. If you complete both as you log from WSJT then the log entry is saved into N3FJP automatically.

Note: in JTAlert v2.13.6 I noticed the above steps work fine on Windows 10 if you are logged in as an Admin user. If you log in as a regular user, JTAlert will not copy logs across to N3FJP, unless you start JTAlert with ‘Run as Administrator’. Also, it will pop up the warning message saying that it failed to check if the log was successfully written, even though it is written to N3FJP successfully. There is a timing setting in the JTAlert Performance settings to increase the length of time before the N3FJP is checked for a successful log, but it doesn’t appear to make any difference for this issue.

Next up, I’ll look at getting fldigi setup to also log direct to N3FJP.

Running Oracle 19c in a Docker container: part 2: server up and running

Following on from my first attempt to get Oracle 19c running in a Docker container and running out of disk space in my VM, I increased the disk space to 40GB and restarted the steps to build the image. It took about 1.5hrs to complete building and doing the install into the image. Although building an image is a one time activity, unless you’re making changes to the image that’s still a long time, and not something you can do on a regular basis or on demand.

Next, starting up an container from the image, using the provided docker command from the docs:

docker run --name <container name> \
-p <host port>:1521 -p <host port>:5500 \
-e ORACLE_SID=<your SID> \
-e ORACLE_PDB=<your PDB name> \
-e ORACLE_PWD=<your database passwords> \
-e ORACLE_CHARACTERSET=<your character set> \
-v [<host mount point>:]/opt/oracle/oradata \
oracle/database:19.3.0-se2

It then takes around 30mins before the server is actually up and running. At least it gives you some percentage status outputs as it’s starting up, but again, not really practical for starting a server up ondemand or on a whim. For reference, this is on my HP DL380 G7 server with dual 2.4GHz Xeons, running in an Ubuntu 18.04 VM with 4 vCpus and 8GB RAM.

Up and running:

LSNRCTL for Linux: Version 19.0.0.0.0 - Production on 24-MAY-2019 04:55:03
Copyright (c) 1991, 2019, Oracle. All rights reserved.
Starting /opt/oracle/product/19c/dbhome_1/bin/tnslsnr: please wait…
TNSLSNR for Linux: Version 19.0.0.0.0 - Production
System parameter file is /opt/oracle/product/19c/dbhome_1/network/admin/listener.ora
Log messages written to /opt/oracle/diag/tnslsnr/8363ae964727/listener/alert/log.xml
Listening on: (DESCRIPTION=(ADDRESS=(PROTOCOL=ipc)(KEY=EXTPROC1)))
Listening on: (DESCRIPTION=(ADDRESS=(PROTOCOL=tcp)(HOST=0.0.0.0)(PORT=1521)))
Connecting to (DESCRIPTION=(ADDRESS=(PROTOCOL=IPC)(KEY=EXTPROC1)))
STATUS of the LISTENER
Alias LISTENER
Version TNSLSNR for Linux: Version 19.0.0.0.0 - Production
Start Date 24-MAY-2019 04:55:04
Uptime 0 days 0 hr. 0 min. 1 sec
Trace Level off
Security ON: Local OS Authentication
SNMP OFF
Listener Parameter File /opt/oracle/product/19c/dbhome_1/network/admin/listener.ora
Listener Log File /opt/oracle/diag/tnslsnr/8363ae964727/listener/alert/log.xml
Listening Endpoints Summary…
(DESCRIPTION=(ADDRESS=(PROTOCOL=ipc)(KEY=EXTPROC1)))
(DESCRIPTION=(ADDRESS=(PROTOCOL=tcp)(HOST=0.0.0.0)(PORT=1521)))
The listener supports no services
The command completed successfully

Prepare for db operation
8% complete
Copying database files
31% complete
Creating and starting Oracle instance
32% complete
36% complete
40% complete
43% complete
46% complete
Completing Database Creation
51% complete
54% complete
Creating Pluggable Databases
58% complete
77% complete
Executing Post Configuration Actions
100% complete
Database creation complete. For details check the logfiles at:
/opt/oracle/cfgtoollogs/dbca/ORADB1.
Database Information:
Global Database Name:ORADB1
System Identifier(SID):ORADB1
Look at the log file "/opt/oracle/cfgtoollogs/dbca/ORADB1/ORADB1.log" for further details.
SQL*Plus: Release 19.0.0.0.0 - Production on Fri May 24 05:17:49 2019
Version 19.3.0.0.0
Copyright (c) 1982, 2019, Oracle. All rights reserved.
Connected to:
Oracle Database 19c Standard Edition 2 Release 19.0.0.0.0 - Production
Version 19.3.0.0.0

Created a connection in SQLDeveloper and can connect!

Running Oracle 19c in a Docker container: part 1: out of disk space on my VM

This should be filed under “Can you? Yes. Should you? Probably not”

I tried creating a Docker container running Oracle 19c from Oracle official dockerfiles, and straight out of the gate ran out of diskspace:


!!!!!!!!!!!!!!!!!!!!!!!!!!!!!!!!!!!!!!!!!!!!!!!!!!!!!!!!!!!!!!!!!!!!!!!!!!!!!!!!!!!!!!!!!!!!!!!!
checkSpace.sh: ERROR - There is not enough space available in the docker container.
checkSpace.sh: The container needs at least 18 GB, but only 14 GB are available.
!!!!!!!!!!!!!!!!!!!!!!!!!!!!!!!!!!!!!!!!!!!!!!!!!!!!!!!!!!!!!!!!!!!!!!!!!!!!!!!!!!!!!!!!!!!!!!!!
Removing intermediate container b53a5e13a45c
The command '/bin/sh -c chmod ug+x $INSTALL_DIR/*.sh &&     sync &&     $INSTALL_DIR/$CHECK_SPACE_FILE &&     $INSTALL_DIR/$SETUP_LINUX_FILE &&     rm -rf $INSTALL_DIR' returned a non-zero code: 1


ERROR: Oracle Database Docker Image was NOT successfully created.
ERROR: Check the output and correct any reported problems with the docker build operation.

$ df -h
Filesystem      Size  Used Avail Use% Mounted on
udev            3.9G     0  3.9G   0% /dev
tmpfs           798M  1.3M  797M   1% /run
/dev/sda2        30G   12G   17G  41% /

The container needs at least 18GB? Of course it does.

Time to expand my VM disk space (using notes from when I previously had to do this here), and try again.

Pause when sudo’ing commands on Ubuntu 18.04

I just installed an Ubuntu 18.04 server and noticed when using sudo for commands, it would pause for about 10 secs then execute the command.

A quick google found this post, mentioning that if you change the hostname during install, you should manually add the same hostname to the /etc/hosts for 127.0.0.1.

I did this and now sudo commands execute instantly as expected.