Creating AWS EC2 Spot Instances with a Launch Template

With EC2, you have a huge variety of instance types to chose from, and with each type having a range of sizes small to large:

  • General Purpose
  • Compute Optimized
  • GPU instances
  • FPGA instances
  • Memory Optimized
  • Storage Optimized

For each of the types you have a further range of options for how you chose to provision an instance, which has an impact on how the instance is priced:

  • On-demand: requested and provisiond as you need them
  • Spot Instances: spare capacity instances auctioned at a lower price than On-Demand, but may not always be available. You request a price, if an instance is available at that price it is provisioned, otherwise you wait until available (see current pricing here)
  • Reserved Instances
  • Dedicated Hosts
  • Dedicated Instances

I’ve never created a Spot Instance before, and I’m curious what the steps are. As with every service on AWS, there’s more than one approach, and I’ve going to look at using a Launch Template:

Bu creating a Launch Template you can configure a number of settings for you instance (AMI image, EC2 instance type, etc).

From the Request Spot Instance page in the EC2 Management Console, you can now use your Launch Template which prepopulates most of the settings for your requested Spot Instance:

Further down on this page is where you request your pricing – it defaults to buy at cheapest available, and is capped at the current On-Demand price (if the spot price rises to match the On-Demand price then there’s no savings from the Spot pricing and you might as well get On-Demand instead):

After submitted, it shows the request in a submitted state:

So here’s my first error:

Repeated errors have occured processing the launch specification “t2.small, ami-41e0b93b, Linux/UNIX (Amazon VPC), us-east-1d”. It will not be retried for at least 13 minutes. Error message: com.amazonaws.services.ec2.model.AmazonEC2Exception: Network interfaces and an instance-level subnet ID may not be specified on the same request (Service: AmazonEC2; Status Code: 400; Error Code: InvalidParameterCombination)

Network instances and a instance-level subnet – I did add an interface because I wanted to select the public ip option. Let’s create a new version of the template and try again.

Now my request is in ‘pending fulfillment’ status:

Same error. One of the answers here suggests this is because I don’t have a Security Group. Ok, let’s add a Security Group to the launch template and try again.

Same error even though I added a Security Group to my template, but I noticed this is the Request Spot Instance options – when you select your Template, if you’ve made version updates to your template, make sure you select the latest version as it defaults to 1, i.e. I was restarting with the original template that I know doesn’t work:

Next error:

com.amazonaws.services.ec2.model.AmazonEC2Exception: The security group ‘sg-825bfe14’ does not exist in VPC ‘vpc-058f5d7c’ (Service: AmazonEC2; Status Code: 400; Error Code: InvalidGroup.NotFound)

Hmm. So I’m interpreting this as my Security Group is not for the default VPC that my instance was assigned, so let’s create a new VPC, and then a new Security Group for this VPC:

Now create a new Template version with this new VPC and SG.

Next error:

Error message: com.amazonaws.services.ec2.model.AmazonEC2Exception: Security group sg-b756adc0 and subnet subnet-f756c7bf belong to different networks. (Service: AmazonEC2; Status Code: 400; Error Code: InvalidParameter)

SG and subnet belong to different networks. Ok, getting close. Let’s take a look.

On the VPC for my SG I have: 10.0.0.0/16

On my subnet for us-east-1d I have: 10.0.0.0/24

Ah, ok. let’s add a new subnet for us-east-1d with the same CIDR block and try again.

When creating your spot request, make sure you select your VPC and subnet to match:

Ahah! Now we’re looking good and my Spot Instance is being provisioned:

Ugh, next error:

Looks like in my template I didn’t give a device name (‘missing device name’) for my EBS volume, e.g. /dev/sdb. New template version, trying again.

Next error:

Error message: com.amazonaws.services.ec2.model.AmazonEC2Exception: The parameter iops is not supported for gp2 volumes. (Service: AmazonEC2; Status Code: 400; Error Code: InvalidParameterCombination)

Geesh. Ok, removing the iops value in the template and trying again (would help to have some validation on the template form)

And now:


Fulfilled, we made it, a Spot Instance provisioned!

At this point though my instance was started without a public IP, so now I’ve got the Security Group and Subnet issue sorted, I’ll go back to the template and add a network interface and select ‘assign public IP’. Rather than assigning this on the network interface though, it looks like it’s also an option from the subnet config, so I edited and added it here:

And now we’re up, with a public IP! Whether my User Data init script actually did what it was supposed to is the next thing to check, but I’ll look at that next!

Installing and using s3cmd to copy files to AWS S3

s3cmd is a useful tool that lets you list put and get objects from an AWS S3 bucket. To install:

Install python2.7 with :

sudo apt-get install python2.7

Install setup tools with :

sudo apt-get install python-setuptools

Download and unzip the .zip distro from link here: http://s3tools.org/download

Install with:

sudo python2.7 setup.py install

To see options, run:

s3cmd --help

Before running the s3cmd setup, you need to create an AWS IAM user with programmatic access, to get a access key that will be used by the s3cmd.

First, create a new user from the Management Console, and ensure ‘Programmatic Access’ is checked:

Create a new IAM Policy and attach to this user with read, write and list actions, and restrict the resource to the ARN for this S3 bucket that you want to use the s3cmd with:

If you want to narrow down the permissions to a minimal list, a policy list like this is the minimum needed for s3cmd to work (based on answers to this question on SO):

{
 "Version": "2012-10-17",
 "Statement": [
   {
     "Sid": "Stmt123456",
     "Effect": "Allow",
     "Action": [
       "s3:ListAllMyBuckets"
     ],
     "Resource": [
     "arn:aws:s3:::*"
     ]
   },
   {
     "Sid": "VisualEditor0",
     "Effect": "Allow",
     "Action": [
       "s3:ListBucket",
       "s3:PutObject",
       "s3:PutObjectAcl"
     ],
     "Resource": [
       "arn:aws:s3:::bucketname",
       "arn:aws:s3:::bucketname/*"
     ]
   }
 ]
}

Following how-to guide here, for first time setup, run:

s3cmd --configure

and provide your IAM user api access key and secret key and other values as prompted. After configuring, when prompted to test the config, the util will attempt to list all buckets, but if the policy you created was for limited read/write on a specific bucket, this will fail, but that’s ok.

To confirm access to your bucket, try:

s3cmd ls s3://bucketname

and to put a file:

s3cmd put filename s3:/bucketname


Using Netflix Eureka with Spring Cloud / Spring Boot microservices (part 2)

Several months back I started to look at setting up a simple example app with Spring Boot microservices using Netflix Eureka as a service registry. I got distracted by other shiny things for a few months, but just went back to finish this off.

The example app comprises of 3 Spring Boot apps:

  • SpringCloudEureka: registers the Eureka server using @EnableEurekaServer
  • SpringBootService1 with endpoint POST /service1/example1/address
    • registers with Eureka server with @EnableDiscoveryClient
    • uses Ribbon load balancer aware RestTemplate to call Service2 to validate a zipcode
  • SpringBootService2 provides endpoint GET /service2/zip/{zipcode} which is called by Service1
    • also registers with Eureka server with @EnableDiscoveryClient so it can be looked up by Service1

SpringBootService1 and SpringBootService2 both register with the Eureka server using the annotation @EnableDiscoveryClient. Using some magic with @EnableFeignClients, SpringBootService1 is able to call SpringBootService2 using a regular Spring RestTemplate, but it is Eureka aware and able to lookup SpringBootService2 by service name inplace of an absolute ip and port.

This allows the services to be truly decoupled. Service1 needs to know it needs to call Service2 to perform some purpose (in this case validate a zip code), but it doesn’t need to know where Service2 is deployed or what ip address/port it is available on.

Example code is available on github here.

Configuring AWS S3 Storage Gateway on VMware ESXi for uploading files to S3 via local NFS mount

AWS provides a VM image that can be run locally to provide a local NFS mount that transparently transfers files copied to the mount to an S3 bucket.

To setup, start by creating a Storage Gateway from the AWS Management Console:

Select ‘VMware ESXi’ host platform:

Unzip the downloaded .zip file.

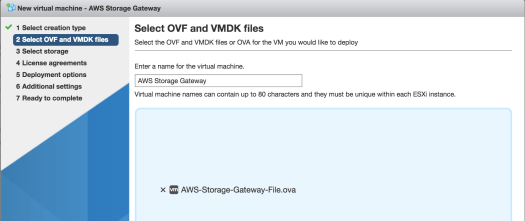
From your ESXi console, create a new VM and select the ‘Deploy VM from OVF / OVA file’ option:

Click the ‘select file’ area and point to the unzipped .ova file on your local machine:

Per Storage Gateway instructions, select Thick provisioned disk:

Press Finish on next Summary screen, and wait for VM to be created.

Back in your AWS Management Console, Next through remaining setup pages, enter IP of your Storage Gateway. The instructions say the VM does not need to be accessible from the internet, and instructions here walk you logging on to the VM with the default credentials to get your IP assuming it’s not already displayed on your ESXi console for the running VM):

Powering on the VM, I get a logon prompt:

After logging on with the default credentials, the next screen gives me the assigned IP:

Entering the IP in the Management Console, setting timezone to match my local timezone, and then press Activate to continue:

At this point, AWS is telling me I didn’t create any local disks attached to my VM, which is true, I missed that step:

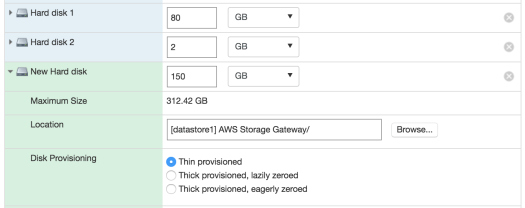
According to the docs you need to attach 1 disk for an upload buffer, and 1 for cache storage (files pending upload). Powering down my VM, I created 2 new disks, 2GB each (since this is just for testing):

Pressing the refresh icon, the disks are now detected (interesting that AWS is able to communicate with my VM?),  and it tells me the cache disk needs to be at least 150GB:

Powering down the VM again and increasing one of the disks to 150GB, but thinly provisioned (not sure I have too much spare disk on my server for 150GB thickly provisioned):

Powering back on, pressing refresh in the AWS Console:

Ok, maybe it needs to be thick after all. Powering off and provisioning as thick:

I allocated the 150GB drive as the Cache, and left the other drive unallocated for now. Next to allocate a share:

At this point you need to configure the file share to point to an existing S3 bucket, so make sure you have one created at this point, if not open another Console and create one then enter it here:

By default, any client that’s able to mount my share on my VM locally is allowed to upload to this bucket. This can be configured by pressing edit. I’ll leave as the default for now. Press the Create File Share button to complete, and we’re done!


Next following the instructions here, let’s mount the Storage Gateway file share and test uploading a file:

For Linux:

sudo mount -t nfs -o nolock [Your gateway VM IP address]:/[S3 bucket name] [mount path on your client]

For MacOS:

sudo mount_nfs -o vers=3,nolock -v [Your gateway VM IP address]:/[S3 bucket name] [mount path on your client]:

Note: from the AWS docs there’s a missing space between the nfs drive and the mount point in both of these examples, and the Linux example has a trailing ‘:’ which is also not needed.

For Ubuntu, if you haven’t installed nfs-common, you’ll need to do that first with

sudo apt-get install install nfs-common

… otherwise you’ll get this error when attempting to mount:

mount: wrong fs type, bad option, bad superblock on ...

For Ubuntu, here’s my working mount statement (after installing nfs-common):

sudo mount -t nfs -o nolock vm-ip-address:/s3bucket-name /media/s3gw

… where /media/s3gw is my mount point (created earlier).

To test, I create a file, copied to the mount dir, and then took a look at my bucket contents via the Console:

My file is already there, everything is working!